前言

  YOLOv5 是一个目标检测算法,它是由 Ultralytics 开发的基于深度学习的实时目标检测框架。我这里主要是想在 orangepi5 plus板子上实现目标检测。

我所使用的配置和环境:
1、linux板子(orangepi5 plus 16G)
2、linux操作系统(ubuntu22.04)
3、USB摄像头

如何使用yolov5

  yolov5是基于python开发的,他的使用有些类似opencv的使用,首先要给他创建python环境,最好是用Anaconda+Pycharm的环境结构,他是通过构建一个python的虚拟环境,类似虚拟机,然后在这个环境下安装yolov5的虚拟环境。看到也有使用docker跑yolov5的,那样更简单。
  我之前以为Anaconda像docker一样,创建的容器互不影响,没想到他巨垃圾,他不同镜像之间的库是公用的,也就是你在一个镜像里升级一个库,那么如果其他镜像中也有这个库,那这两个库的版本会保持一致,很恶心,你想测试在不同版本下的运行情况就行不通了。

ubuntu环境下测试

现在办公室的闲置主机上跑yolov5训练,之后将程序移植到orangepi5p的板子上
闲置主机配置:ubuntu22.04 cpu:AMD1400 显卡:1050

在ubuntu和windows上其实操作都差不多,反正都是在anaconda的虚拟环境下进行,哪儿都一样

安装anaconda

  Anaconda 是一个开源的 Python 和 R 编程语言的发行版本,用于科学计算、数据分析和机器学习任务。它包含了各种常用的科学计算库和工具,以及一个强大的包管理系统,使得安装和管理 Python 环境变得更加简单。  

1、在官网下载 https://www.anaconda.com/download 对应版本的安装包
2、 安装 bash Anaconda3xxxxx86_64.sh 安装后重新打开命令行才能使用conda命令

安装 pytorch

  PyTorch 是一个由 Facebook 开发和维护的开源深度学习框架,它提供了丰富的工具和接口,用于构建和训练各种类型的神经网络模型。  

  以下是 PyTorch 的一些特点和功能:

  动态图计算:PyTorch 使用动态图计算方式,使得用户可以灵活地定义、修改和调试模型。这意味着你可以在运行时改变计算流程,编写更加灵活和可读性强的代码,并且方便地进行调试和可视化。  

  强大的 GPU 支持:PyTorch 提供了对 GPU 的广泛支持,可以利用 GPU 加速神经网络的训练和推断过程。这使得你可以利用 GPU 的并行计算能力,大幅提高深度学习任务的计算效率和训练速度。  

  灵活的数据处理:PyTorch 提供了丰富的数据处理工具,如数据加载、预处理、数据增强等。它与 Python 生态系统紧密集成,可以方便地与 NumPy、Pandas 和其他常用库进行数据交互和转换。  

  高级网络构建:PyTorch 提供了一套简洁而又强大的 API,用于构建各种类型的神经网络模型,包括卷积神经网络、循环神经网络、生成对抗网络等。你可以直观地定义网络结构,并且方便地扩展和自定义模型。  

  丰富的生态系统:PyTorch 拥有庞大而活跃的社区,你可以在社区中获取技术支持、分享经验和解决问题。此外,PyTorch 还有许多扩展库和预训练模型,使得开发深度学习应用更加高效和便捷。  

安装前,先用anaconda创建一个python环境 conda create -n pytorch1.6 python=3.8
创建成功后进入该环境: conda activate pytorch1.6

安装pytorch 1.6版本,cuda 10.2版本, cuda的版本需要根据显卡配置选择,普通的显卡10.2可以,30系列的得11版本之后的。
conda install pytorch torchvision cudatookit=10.2 -c pytorch
设置 python环境为 python3.8,将下面的代码添加到 ~./bashrc文件的最下面
alias python='home/laohu/anaconda3/envs/pytorch1.6/bin/python3.8' 结合自己的路径修改

yolov5的克隆和安装

1、克隆yolov5的项目到本地
git clone https://github.com/ultralytics/yolov5.git

2、安装yolov5的依赖
pip install -r requirements.txt -i https://pypi.tuna.tsinghua.edu.cn/simple
最好用清华源,不加编译可能会出错。

到此就算是完成了环境搭建,最后再下载个运行图像处理时的权重文件,在yolo文件夹下创建个 weights ,将yolov5官网的 yolov5s.pt,yolov5m.pt,yolov5l.pt,yolov5x.pt 下载下来添加进去。运行程序的时候可以选择指定哪个权重文件的配置。不同的配置的识别时间和精确度不一样。
微信截图_20230717180408.jpg

yolov5测试

yolo文件夹里自带了一份测试程序以及测试图片,直接运行测试程序即可
python detecr.py
python detecr.py --weights weights/yolov5.pt 指定权重文件
python detecr.py --conf 0.4 设置预测率大于0.4的模型
python detecr.py --source data/images/bus.jpg 设置检测指定的图片
python detecr.py --source screen 设置检测当前屏幕

conf-thres 值越高 框越少

将yolov5模型移植到orangepi5板子上

  前面搭建的环境是为了可以开发yolov5的模型,训练模型,真正到linux板子上工作的时候就需要把模型一直到板子上运行,你不能直接拿台主机去跑项目吧,最终还是用应用到工控机上。
  大致步骤是,将训练好的模型转化为集成包,就类似是将开发测试的程序最终做成了APP安装包,这样可以减少他对运行环境的依赖,而且速度也会提高。

将yolov5模型 pt模型转化成onmx模型

因为是在pytorch环境上训练的,生成的模型也是 pt文件,pt就是指pytorch,需要转化成.onmx文件,(ONNX 是一种开放的模型表示格式,被多个深度学习框架所支持(如PyTorch、TensorFlow等),可以实现模型在不同框架之间的互操作性。通过将模型转换为 ONNX 格式,可以使得模型能够在其他支持 ONNX 的框架中进行部署和推理,提高了模型的灵活性和可移植性)

修改 yolo.py文件

这个步骤我也搞不懂是干什么的,是官方这里指出的,只是说不该后续生成会有错误
https://github.com/rockchip-linux/rknn-toolkit/tree/master/examples/pytorch/yolov5
yolov5模型导出需要注意的地方
yolov5官方仓库地址为 https://github.com/ultralytics/yolov5

直接使用pt模型转为rknn模型时,需要修改 yolov5/models/yolo.py文件的后处理部分,将class Detect(nn.Module) 类的子函数forward由

def forward(self, x):
z = [] # inference output
for i in range(self.nl):
x[i] = self.m[i](x[i]) # conv
bs, _, ny, nx = x[i].shape # x(bs,255,20,20) to x(bs,3,20,20,85)
x[i] = x[i].view(bs, self.na, self.no, ny, nx).permute(0, 1, 3, 4, 2).contiguous()

if not self.training: # inference
if self.grid[i].shape[2:4] != x[i].shape[2:4] or self.onnx_dynamic:
self.grid[i], self.anchor_grid[i] = self._make_grid(nx, ny, i)

y = x[i].sigmoid()
if self.inplace:
y[..., 0:2] = (y[..., 0:2] * 2. - 0.5 + self.grid[i]) * self.stride[i] # xy
y[..., 2:4] = (y[..., 2:4] * 2) ** 2 * self.anchor_grid[i] # wh
else: # for YOLOv5 on AWS Inferentia https://github.com/ultralytics/yolov5/pull/2953
xy = (y[..., 0:2] * 2. - 0.5 + self.grid[i]) * self.stride[i] # xy
wh = (y[..., 2:4] * 2) ** 2 * self.anchor_grid[i] # wh
y = torch.cat((xy, wh, y[..., 4:]), -1)
z.append(y.view(bs, -1, self.no))

return x if self.training else (torch.cat(z, 1), x)

修改为:

def forward(self, x):
z = [] # inference output
for i in range(self.nl):
x[i] = self.m[i](x[i]) # conv

return x

生成Onnx文件

将pt模型转化成Onnx文件,这里的模型我是用得官方下载的yolov5n.pt,opset 12 这个设置成12,或者修改export.py第52行,改成opset_version=12

python export.py --weights yolov5n.pt --data data/coco128.yaml --include onnx --opset 12 --batch-size 1

如果编译错误,提示

File "export.py", line 760, in run
shape = tuple((y[0] if isinstance(y, tuple) else y).shape) # model output shape

则修改export.py中的shape

shape = tuple(y[0].shape) # model output shape

微信截图_20230718144714.jpg

程序运行结束后,会在当前文件夹下生成yolov5n.onnx文件

onnx转化为rknn格式

创建新的python环境

转化必须使用Ubuntu系统,用conda创建一个新的环境
conda create -n rknn python=3.8
进入该环境 conda activate rknn

克隆rknn

克隆rknn的项目到用户文件夹下 https://github.com/rockchip-linux/rknn-toolkit2/tree/master 克隆最新版1.5.0版本

踩坑!!!!划重点!!! 可最后再回来看这一节

踩坑!!! 现在rknn-toolkit2最新版是1.5.0版本,我最开始是下载的最新版本,然后在香橙派5上也是1.5.0,安装一切都顺利,就是到最后在板子上跑程序的时候,提示版本不匹配,但是可以运行,就是帧数是几秒一帧,它提示模型版本和运行环境是1.5.0版本,但是run time 运行版本是1.4.0版本,一开始不懂什么意思,索性我把环境重新退回1.4.0就行了么,结果1.4.0在安装的过程中相当麻烦,有很多bug,好不容易装好了,又无法转化成rknn,试了好多次无济于事,网上的帖子基本是1.4.0的,他们当时可能没问题;最后才明白是香橙派板子的npu版本是1.4.0的,所以得更新香橙派板子的驱动

npu驱动升级 可最后再回来看这一节

如果配置环境全使用 rknn-toolkit2 1.4.0 则最后转化rknn会出错,而且安装过程也要比1.5.0困难的多。

upload successful
这个报错一直没解决

运行1.5.0 的程序会有警告提示不匹配
W RKNN: [09:39:53.588] RKNN Model version: 1.5.0 not match with rknn runtime version: 1.4.0
警告说得是,yolov5的rknn模型是1.5.0版本的,环境也是1.5.0版本,但是系统的rknn runtime version 是1.4.0,这里指的是npu驱动,所以要想使用1.5.0版本,也得把系统runtime库 的npu升级到1.5.0版本。

升级过程:

https://github.com/PaddlePaddle/FastDeploy/blob/develop/docs/cn/faq/rknpu2/environment.md

在上面的网盘里找到 librknnrt.so 这个文件,注意版本,别下载成安卓的,根据自己版本选择。
最后把这个文件放到 /usr/lib64文件下,替换之前的文件

安装rknn环境依赖

进入该文件下的doc目录,安装依赖
pip install -r requirements_cp38-1.5.0.txt -i https://pypi.tuna.tsinghua.edu.cn/simple

1689666859160.jpg

该文件夹下有四个依赖包的文本,每次更新,他的文本名都会改。需要理解下他的名称:

requirements_cp36-1.5.0.txt:适用于 Python 3.6 版本。
requirements_cp38-1.5.0.txt:适用于 Python 3.8 版本。
requirements_cp310-1.5.0.txt:适用于 Python 3.10 版本。

还是选择清华的镜像源,因为前面安装yolov5的依赖不使用清华的会报错,所以这次直接使用清华的

这里我在安装的时候报错 大致是因为 numpy 和 uild-essential 这两个库有问题,可以先安装这两个包,再去安装依赖,即可解决报错。

安装rknn_toolkit2
upload successful

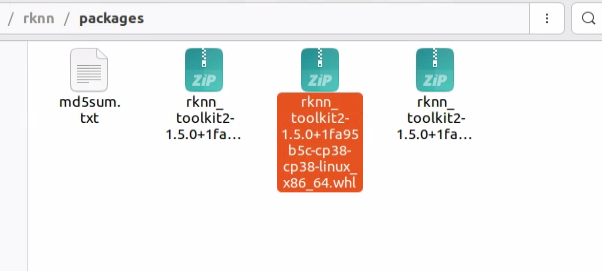
packages目录下依旧有三个包,还是选择python3.8的包进行安装:

pip install rknn_toolkit2-1.5.0+1fa95b5c-cp38-cp38-linux_x86_64.whl

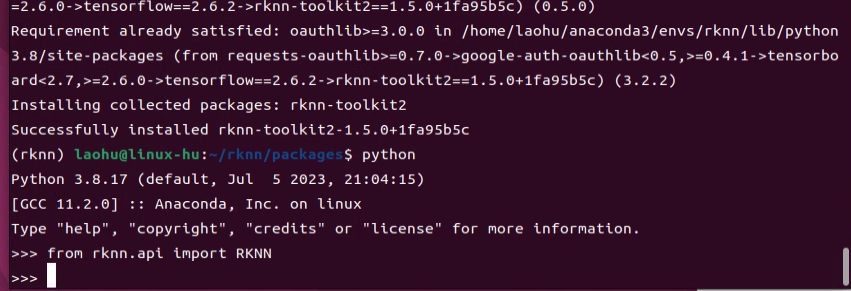
安装成功后,输入python进入python命令行,然后执行 from rknn.api import RKNN rknn.api 模块导入 RKNN 类

测试是否成功,同下图则表明安装成功
upload successful

修改运行程序test.py

程序所在目录:rknn/examples/onnx/yolov5

upload successful

1、修改 选择的模型和生成模型的名称
2、修改识别分类的对象

upload successful

3、修改linux板子型号

执行程序test.py

把得到的onnx文件放入rknn/examples/onnx/yolov5文件夹下

cd到所在文件夹下 执行python test.py

此时这个目录下也会生成一个yolov5n.rknn文件

部署orangepi5 的yolo环境

  yolov5是基于python环境开发的,自然也需要在yolov5上搭建python环境,这里依然是利用anaconda创建python的虚拟环境,当然也可以直接在ubuntu系统里配置环境,anaconda只是起到个隔离的作用,类似docker;在conda的虚拟环境下需要安装rknn的环境,以至于可运行转化后的rknn的模型,然后再安装个opencv的库,用于图像的采集和标注等

安装anaconda

这里因为只是应用,不做开发,所以选择minianaconda
https://mirrors.tuna.tsinghua.edu.cn/anaconda/miniconda/ 选择Miniconda3-py39_4.9.2-Linux-aarch64.sh python3.9的版本可以用

下载完后,安装bash Miniconda3-py39_4.9.2-Linux-aarch64.sh 不要使用root用户,不然只有root才能使用

更换conda的镜像源

conda config --add channels https://mirrors.tuna.tsinghua.edu.cn/anaconda/pkgs/free/
conda config --add channels https://mirrors.tuna.tsinghua.edu.cn/anaconda/pkgs/main/
conda config --set show_channel_urls yes

创建python环境:conda create --name rknn python=3.9

进入该环境 conda activate rknn

配置yolov5环境

先进入该环境 conda activate rknn 别不小心安装在原系统,虽然也可以用 但conda就白折腾了 哈哈哈
更换python环境下的镜像源:pip config set global.index-url https://pypi.tuna.tsinghua.edu.cn/simple

把PC上的rknn_toolkit2/rknn_toolkit_lite2/packages中的python3.9 的linux_aarch64.whl传输到香橙派上,注意是py3.9的版本,pc上装的是py3.8的版本

在python环境下进行安装 pip install rknn_toolkit_lite2-1.5.0-cp39-cp39-linux_aarch64.whl

安装opencv的库 pip install opencv-python

运行yolov5模型

创建个 deploy.py 文件,即可在刚才创建的yolov5环境下运行模型。

例程1 识别bus.jpg的图片 注意图片路径
import numpy as np
import cv2
from rknnlite.api import RKNNLite

RKNN_MODEL = 'yolov5n.rknn'

QUANTIZE_ON = True

OBJ_THRESH = 0.25
NMS_THRESH = 0.45
IMG_SIZE = 640

IMG_PATH = '/home/orangepi/yolov5/bus.jpg'


CLASSES = ("person", "bicycle", "car", "motorbike ", "aeroplane ", "bus ", "train", "truck ", "boat", "traffic light",
"fire hydrant", "stop sign ", "parking meter", "bench", "bird", "cat", "dog ", "horse ", "sheep", "cow", "elephant",
"bear", "zebra ", "giraffe", "backpack", "umbrella", "handbag", "tie", "suitcase", "frisbee", "skis", "snowboard", "sports ball", "kite",
"baseball bat", "baseball glove", "skateboard", "surfboard", "tennis racket", "bottle", "wine glass", "cup", "fork", "knife ",
"spoon", "bowl", "banana", "apple", "sandwich", "orange", "broccoli", "carrot", "hot dog", "pizza ", "donut", "cake", "chair", "sofa",
"pottedplant", "bed", "diningtable", "toilet ", "tvmonitor", "laptop ", "mouse ", "remote ", "keyboard ", "cell phone", "microwave ",
"oven ", "toaster", "sink", "refrigerator ", "book", "clock", "vase", "scissors ", "teddy bear ", "hair drier", "toothbrush ")


def sigmoid(x):
return 1 / (1 + np.exp(-x))


def xywh2xyxy(x):
# Convert [x, y, w, h] to [x1, y1, x2, y2]
y = np.copy(x)
y[:, 0] = x[:, 0] - x[:, 2] / 2 # top left x
y[:, 1] = x[:, 1] - x[:, 3] / 2 # top left y
y[:, 2] = x[:, 0] + x[:, 2] / 2 # bottom right x
y[:, 3] = x[:, 1] + x[:, 3] / 2 # bottom right y
return y


def process(input, mask, anchors):

anchors = [anchors[i] for i in mask]
grid_h, grid_w = map(int, input.shape[0:2])

box_confidence = sigmoid(input[..., 4])
box_confidence = np.expand_dims(box_confidence, axis=-1)

box_class_probs = sigmoid(input[..., 5:])

box_xy = sigmoid(input[..., :2])*2 - 0.5

col = np.tile(np.arange(0, grid_w), grid_w).reshape(-1, grid_w)
row = np.tile(np.arange(0, grid_h).reshape(-1, 1), grid_h)
col = col.reshape(grid_h, grid_w, 1, 1).repeat(3, axis=-2)
row = row.reshape(grid_h, grid_w, 1, 1).repeat(3, axis=-2)
grid = np.concatenate((col, row), axis=-1)
box_xy += grid
box_xy *= int(IMG_SIZE/grid_h)

box_wh = pow(sigmoid(input[..., 2:4])*2, 2)
box_wh = box_wh * anchors

box = np.concatenate((box_xy, box_wh), axis=-1)

return box, box_confidence, box_class_probs


def filter_boxes(boxes, box_confidences, box_class_probs):
"""Filter boxes with box threshold. It's a bit different with origin yolov5 post process!

# Arguments
boxes: ndarray, boxes of objects.
box_confidences: ndarray, confidences of objects.
box_class_probs: ndarray, class_probs of objects.

# Returns
boxes: ndarray, filtered boxes.
classes: ndarray, classes for boxes.
scores: ndarray, scores for boxes.
"""
boxes = boxes.reshape(-1, 4)
box_confidences = box_confidences.reshape(-1)
box_class_probs = box_class_probs.reshape(-1, box_class_probs.shape[-1])

_box_pos = np.where(box_confidences >= OBJ_THRESH)
boxes = boxes[_box_pos]
box_confidences = box_confidences[_box_pos]
box_class_probs = box_class_probs[_box_pos]

class_max_score = np.max(box_class_probs, axis=-1)
classes = np.argmax(box_class_probs, axis=-1)
_class_pos = np.where(class_max_score >= OBJ_THRESH)

boxes = boxes[_class_pos]
classes = classes[_class_pos]
scores = (class_max_score* box_confidences)[_class_pos]

return boxes, classes, scores


def nms_boxes(boxes, scores):
"""Suppress non-maximal boxes.

# Arguments
boxes: ndarray, boxes of objects.
scores: ndarray, scores of objects.

# Returns
keep: ndarray, index of effective boxes.
"""
x = boxes[:, 0]
y = boxes[:, 1]
w = boxes[:, 2] - boxes[:, 0]
h = boxes[:, 3] - boxes[:, 1]

areas = w * h
order = scores.argsort()[::-1]

keep = []
while order.size > 0:
i = order[0]
keep.append(i)

xx1 = np.maximum(x[i], x[order[1:]])
yy1 = np.maximum(y[i], y[order[1:]])
xx2 = np.minimum(x[i] + w[i], x[order[1:]] + w[order[1:]])
yy2 = np.minimum(y[i] + h[i], y[order[1:]] + h[order[1:]])

w1 = np.maximum(0.0, xx2 - xx1 + 0.00001)
h1 = np.maximum(0.0, yy2 - yy1 + 0.00001)
inter = w1 * h1

ovr = inter / (areas[i] + areas[order[1:]] - inter)
inds = np.where(ovr <= NMS_THRESH)[0]
order = order[inds + 1]
keep = np.array(keep)
return keep


def yolov5_post_process(input_data):
masks = [[0, 1, 2], [3, 4, 5], [6, 7, 8]]
anchors = [[10, 13], [16, 30], [33, 23], [30, 61], [62, 45],
[59, 119], [116, 90], [156, 198], [373, 326]]

boxes, classes, scores = [], [], []
for input, mask in zip(input_data, masks):
b, c, s = process(input, mask, anchors)
b, c, s = filter_boxes(b, c, s)
boxes.append(b)
classes.append(c)
scores.append(s)

boxes = np.concatenate(boxes)
boxes = xywh2xyxy(boxes)
classes = np.concatenate(classes)
scores = np.concatenate(scores)

nboxes, nclasses, nscores = [], [], []
for c in set(classes):
inds = np.where(classes == c)
b = boxes[inds]
c = classes[inds]
s = scores[inds]

keep = nms_boxes(b, s)

nboxes.append(b[keep])
nclasses.append(c[keep])
nscores.append(s[keep])

if not nclasses and not nscores:
return None, None, None

boxes = np.concatenate(nboxes)
classes = np.concatenate(nclasses)
scores = np.concatenate(nscores)

return boxes, classes, scores


def draw(image, boxes, scores, classes):
"""Draw the boxes on the image.

# Argument:
image: original image.
boxes: ndarray, boxes of objects.
classes: ndarray, classes of objects.
scores: ndarray, scores of objects.
all_classes: all classes name.
"""
for box, score, cl in zip(boxes, scores, classes):
top, left, right, bottom = box
print('class: {}, score: {}'.format(CLASSES[cl], score))
print('box coordinate left,top,right,down: [{}, {}, {}, {}]'.format(top, left, right, bottom))
top = int(top)
left = int(left)
right = int(right)
bottom = int(bottom)

cv2.rectangle(image, (top, left), (right, bottom), (255, 0, 0), 2)
cv2.putText(image, '{0} {1:.2f}'.format(CLASSES[cl], score),
(top, left - 6),
cv2.FONT_HERSHEY_SIMPLEX,
0.6, (0, 0, 255), 2)


def letterbox(im, new_shape=(640, 640), color=(0, 0, 0)):
# Resize and pad image while meeting stride-multiple constraints
shape = im.shape[:2] # current shape [height, width]
if isinstance(new_shape, int):
new_shape = (new_shape, new_shape)

# Scale ratio (new / old)
r = min(new_shape[0] / shape[0], new_shape[1] / shape[1])

# Compute padding
ratio = r, r # width, height ratios
new_unpad = int(round(shape[1] * r)), int(round(shape[0] * r))
dw, dh = new_shape[1] - new_unpad[0], new_shape[0] - new_unpad[1] # wh padding

dw /= 2 # divide padding into 2 sides
dh /= 2

if shape[::-1] != new_unpad: # resize
im = cv2.resize(im, new_unpad, interpolation=cv2.INTER_LINEAR)
top, bottom = int(round(dh - 0.1)), int(round(dh + 0.1))
left, right = int(round(dw - 0.1)), int(round(dw + 0.1))
im = cv2.copyMakeBorder(im, top, bottom, left, right, cv2.BORDER_CONSTANT, value=color) # add border
return im, ratio, (dw, dh)


if __name__ == '__main__':

# Create RKNN object
rknn = RKNNLite()

# load RKNN model
print('--> Load RKNN model')
ret = rknn.load_rknn(RKNN_MODEL)


# Init runtime environment
print('--> Init runtime environment')
ret = rknn.init_runtime(core_mask=RKNNLite.NPU_CORE_0_1_2) #使用0 1 2三个NPU核心
# ret = rknn.init_runtime('rk3566')
if ret != 0:
print('Init runtime environment failed!')
exit(ret)
print('done')

# Set inputs
img = cv2.imread(IMG_PATH)
# img, ratio, (dw, dh) = letterbox(img, new_shape=(IMG_SIZE, IMG_SIZE))
img = cv2.cvtColor(img, cv2.COLOR_BGR2RGB)
img = cv2.resize(img, (IMG_SIZE, IMG_SIZE))

# Inference
outputs = rknn.inference(inputs=[img])


# post process
input0_data = outputs[0]
input1_data = outputs[1]
input2_data = outputs[2]

input0_data = input0_data.reshape([3, -1]+list(input0_data.shape[-2:]))
input1_data = input1_data.reshape([3, -1]+list(input1_data.shape[-2:]))
input2_data = input2_data.reshape([3, -1]+list(input2_data.shape[-2:]))

input_data = list()
input_data.append(np.transpose(input0_data, (2, 3, 0, 1)))
input_data.append(np.transpose(input1_data, (2, 3, 0, 1)))
input_data.append(np.transpose(input2_data, (2, 3, 0, 1)))

boxes, classes, scores = yolov5_post_process(input_data)

img_1 = cv2.cvtColor(img, cv2.COLOR_RGB2BGR)
if boxes is not None:
draw(img_1, boxes, scores, classes)
# show output
cv2.imshow("post process result", img_1)
cv2.waitKey(0)
cv2.destroyAllWindows()

rknn.release()


例程2 实时视频显示
import numpy as np
import cv2
from rknnlite.api import RKNNLite
import time
import sys

RKNN_MODEL = 'yolov5n.rknn'

QUANTIZE_ON = True

OBJ_THRESH = 0.25
NMS_THRESH = 0.45
IMG_SIZE = 640


CLASSES = ("person", "bicycle", "car", "motorbike ", "aeroplane ", "bus ", "train", "truck ", "boat", "traffic light",
"fire hydrant", "stop sign ", "parking meter", "bench", "bird", "cat", "dog ", "horse ", "sheep", "cow", "elephant",
"bear", "zebra ", "giraffe", "backpack", "umbrella", "handbag", "tie", "suitcase", "frisbee", "skis", "snowboard", "sports ball", "kite",
"baseball bat", "baseball glove", "skateboard", "surfboard", "tennis racket", "bottle", "wine glass", "cup", "fork", "knife ",
"spoon", "bowl", "banana", "apple", "sandwich", "orange", "broccoli", "carrot", "hot dog", "pizza ", "donut", "cake", "chair", "sofa",
"pottedplant", "bed", "diningtable", "toilet ", "tvmonitor", "laptop ", "mouse ", "remote ", "keyboard ", "cell phone", "microwave ",
"oven ", "toaster", "sink", "refrigerator ", "book", "clock", "vase", "scissors ", "teddy bear ", "hair drier", "toothbrush ")


def sigmoid(x):
return 1 / (1 + np.exp(-x))


def xywh2xyxy(x):
# Convert [x, y, w, h] to [x1, y1, x2, y2]
y = np.copy(x)
y[:, 0] = x[:, 0] - x[:, 2] / 2 # top left x
y[:, 1] = x[:, 1] - x[:, 3] / 2 # top left y
y[:, 2] = x[:, 0] + x[:, 2] / 2 # bottom right x
y[:, 3] = x[:, 1] + x[:, 3] / 2 # bottom right y
return y


def process(input, mask, anchors):

anchors = [anchors[i] for i in mask]
grid_h, grid_w = map(int, input.shape[0:2])

box_confidence = sigmoid(input[..., 4])
box_confidence = np.expand_dims(box_confidence, axis=-1)

box_class_probs = sigmoid(input[..., 5:])

box_xy = sigmoid(input[..., :2])*2 - 0.5

col = np.tile(np.arange(0, grid_w), grid_w).reshape(-1, grid_w)
row = np.tile(np.arange(0, grid_h).reshape(-1, 1), grid_h)
col = col.reshape(grid_h, grid_w, 1, 1).repeat(3, axis=-2)
row = row.reshape(grid_h, grid_w, 1, 1).repeat(3, axis=-2)
grid = np.concatenate((col, row), axis=-1)
box_xy += grid
box_xy *= int(IMG_SIZE/grid_h)

box_wh = pow(sigmoid(input[..., 2:4])*2, 2)
box_wh = box_wh * anchors

box = np.concatenate((box_xy, box_wh), axis=-1)

return box, box_confidence, box_class_probs


def filter_boxes(boxes, box_confidences, box_class_probs):
"""Filter boxes with box threshold. It's a bit different with origin yolov5 post process!

# Arguments
boxes: ndarray, boxes of objects.
box_confidences: ndarray, confidences of objects.
box_class_probs: ndarray, class_probs of objects.

# Returns
boxes: ndarray, filtered boxes.
classes: ndarray, classes for boxes.
scores: ndarray, scores for boxes.
"""
boxes = boxes.reshape(-1, 4)
box_confidences = box_confidences.reshape(-1)
box_class_probs = box_class_probs.reshape(-1, box_class_probs.shape[-1])

_box_pos = np.where(box_confidences >= OBJ_THRESH)
boxes = boxes[_box_pos]
box_confidences = box_confidences[_box_pos]
box_class_probs = box_class_probs[_box_pos]

class_max_score = np.max(box_class_probs, axis=-1)
classes = np.argmax(box_class_probs, axis=-1)
_class_pos = np.where(class_max_score >= OBJ_THRESH)

boxes = boxes[_class_pos]
classes = classes[_class_pos]
scores = (class_max_score* box_confidences)[_class_pos]

return boxes, classes, scores


def nms_boxes(boxes, scores):
"""Suppress non-maximal boxes.

# Arguments
boxes: ndarray, boxes of objects.
scores: ndarray, scores of objects.

# Returns
keep: ndarray, index of effective boxes.
"""
x = boxes[:, 0]
y = boxes[:, 1]
w = boxes[:, 2] - boxes[:, 0]
h = boxes[:, 3] - boxes[:, 1]

areas = w * h
order = scores.argsort()[::-1]

keep = []
while order.size > 0:
i = order[0]
keep.append(i)

xx1 = np.maximum(x[i], x[order[1:]])
yy1 = np.maximum(y[i], y[order[1:]])
xx2 = np.minimum(x[i] + w[i], x[order[1:]] + w[order[1:]])
yy2 = np.minimum(y[i] + h[i], y[order[1:]] + h[order[1:]])

w1 = np.maximum(0.0, xx2 - xx1 + 0.00001)
h1 = np.maximum(0.0, yy2 - yy1 + 0.00001)
inter = w1 * h1

ovr = inter / (areas[i] + areas[order[1:]] - inter)
inds = np.where(ovr <= NMS_THRESH)[0]
order = order[inds + 1]
keep = np.array(keep)
return keep


def yolov5_post_process(input_data):
masks = [[0, 1, 2], [3, 4, 5], [6, 7, 8]]
anchors = [[10, 13], [16, 30], [33, 23], [30, 61], [62, 45],
[59, 119], [116, 90], [156, 198], [373, 326]]

boxes, classes, scores = [], [], []
for input, mask in zip(input_data, masks):
b, c, s = process(input, mask, anchors)
b, c, s = filter_boxes(b, c, s)
boxes.append(b)
classes.append(c)
scores.append(s)

boxes = np.concatenate(boxes)
boxes = xywh2xyxy(boxes)
classes = np.concatenate(classes)
scores = np.concatenate(scores)

nboxes, nclasses, nscores = [], [], []
for c in set(classes):
inds = np.where(classes == c)
b = boxes[inds]
c = classes[inds]
s = scores[inds]

keep = nms_boxes(b, s)

nboxes.append(b[keep])
nclasses.append(c[keep])
nscores.append(s[keep])

if not nclasses and not nscores:
return None, None, None

boxes = np.concatenate(nboxes)
classes = np.concatenate(nclasses)
scores = np.concatenate(nscores)

return boxes, classes, scores


def draw(image, boxes, scores, classes):
"""Draw the boxes on the image.

# Argument:
image: original image.
boxes: ndarray, boxes of objects.
classes: ndarray, classes of objects.
scores: ndarray, scores of objects.
all_classes: all classes name.
"""
for box, score, cl in zip(boxes, scores, classes):
top, left, right, bottom = box
print('class: {}, score: {}'.format(CLASSES[cl], score))
print('box coordinate left,top,right,down: [{}, {}, {}, {}]'.format(top, left, right, bottom))
top = int(top)
left = int(left)
right = int(right)
bottom = int(bottom)

cv2.rectangle(image, (top, left), (right, bottom), (255, 0, 0), 2)
cv2.putText(image, '{0} {1:.2f}'.format(CLASSES[cl], score),
(top, left - 6),
cv2.FONT_HERSHEY_SIMPLEX,
0.6, (0, 0, 255), 2)


def letterbox(im, new_shape=(640, 640), color=(0, 0, 0)):
# Resize and pad image while meeting stride-multiple constraints
shape = im.shape[:2] # current shape [height, width]
if isinstance(new_shape, int):
new_shape = (new_shape, new_shape)

# Scale ratio (new / old)
r = min(new_shape[0] / shape[0], new_shape[1] / shape[1])

# Compute padding
ratio = r, r # width, height ratios
new_unpad = int(round(shape[1] * r)), int(round(shape[0] * r))
dw, dh = new_shape[1] - new_unpad[0], new_shape[0] - new_unpad[1] # wh padding

dw /= 2 # divide padding into 2 sides
dh /= 2

if shape[::-1] != new_unpad: # resize
im = cv2.resize(im, new_unpad, interpolation=cv2.INTER_LINEAR)
top, bottom = int(round(dh - 0.1)), int(round(dh + 0.1))
left, right = int(round(dw - 0.1)), int(round(dw + 0.1))
im = cv2.copyMakeBorder(im, top, bottom, left, right, cv2.BORDER_CONSTANT, value=color) # add border
return im, ratio, (dw, dh)


if __name__ == '__main__':

# Create RKNN object
rknn = RKNNLite()

# load RKNN model
print('--> Load RKNN model')
ret = rknn.load_rknn(RKNN_MODEL)


# Init runtime environment
print('--> Init runtime environment')
ret = rknn.init_runtime(core_mask=RKNNLite.NPU_CORE_0_1_2) #使用0 1 2三个NPU核心
# ret = rknn.init_runtime('rk3566')
if ret != 0:
print('Init runtime environment failed!')
exit(ret)
print('done')

# Set inputs
cap = cv2.VideoCapture(0) # 0表示默认的摄像头

if (cap.isOpened()== False):
print("Error opening video stream or file")


# Read until video is completed
while(cap.isOpened()):
# Capture frame-by-frame
ret, img = cap.read()
if not ret:
break

img = cv2.cvtColor(img, cv2.COLOR_BGR2RGB)
img = cv2.resize(img, (IMG_SIZE, IMG_SIZE))

# Inference
#print('--> Running model')
outputs = rknn.inference(inputs=[img])

# post process
input0_data = outputs[0]
input1_data = outputs[1]
input2_data = outputs[2]

input0_data = input0_data.reshape([3, -1]+list(input0_data.shape[-2:]))
input1_data = input1_data.reshape([3, -1]+list(input1_data.shape[-2:]))
input2_data = input2_data.reshape([3, -1]+list(input2_data.shape[-2:]))

input_data = list()
input_data.append(np.transpose(input0_data, (2, 3, 0, 1)))
input_data.append(np.transpose(input1_data, (2, 3, 0, 1)))
input_data.append(np.transpose(input2_data, (2, 3, 0, 1)))

boxes, classes, scores = yolov5_post_process(input_data)

img_1 = cv2.cvtColor(img, cv2.COLOR_RGB2BGR)
if boxes is not None:
draw(img_1, boxes, scores, classes)
# show output
cv2.imshow("post process result", img_1)

if cv2.waitKey(25) & 0xFF == ord('q'):
break


cap.release()
cv2.destroyAllWindows()

# rknn.release()